PYNQ-Z1 Setup Guide
Prerequisites for the Pynq-Z1
- PYNQ-Z1 board
- Computer with compatible browser (Supported Browsers)
- Ethernet cable
- Micro USB cable
- Micro-SD card with preloaded image, or blank card (Minimum 8GB recommended)
Getting Started Video
You can watch the getting started video guide, or follow the instructions in Board Setup.
Board Setup
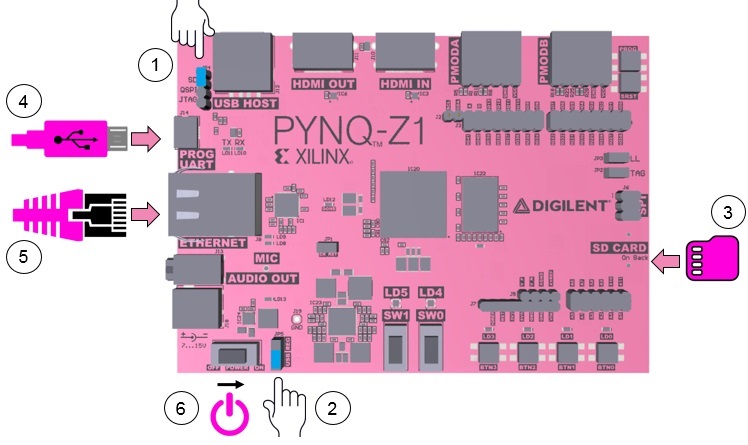
- Set the JP4 / Boot jumper to the SD position by placing the jumper over the top two pins of JP4 as shown in the image. (This sets the board to boot from the Micro-SD card)
- To power the PYNQ-Z1 from the micro USB cable, set the JP5 / Power jumper to the USB position. (You can also power the board from an external 12V power regulator by setting the jumper to REG.)
- Insert the Micro SD card loaded with the PYNQ-Z1 image into the Micro SD card slot underneath the board.
- Connect the USB cable to your PC/Laptop, and to the PROG - UART / J14 MicroUSB port on the board
- Connect the board to Ethernet by following the instructions below
- Turn on the PYNQ-Z1 and check the boot sequence by following the instructions below
Turning On the PYNQ-Z1
As indicated in step 6 of Board Setup, slide the power switch to the ON position to turn on the board. The Red LD13 LED will come on immediately to confirm that the board has power. After a few seconds, the Yellow/Green LD12 / Done LED will light up to show that the Zynq® device is operational.
After a minute you should see two Blue LD4 & LD5 LEDs and four Yellow/Green LD0-LD3 LEDs flash simultaneously. The Blue LD4-LD5 LEDs will then turn on and off while the Yellow/Green LD0-LD3 LEDs remain on. The system is now booted and ready for use.
Network connection
Once your board is setup, you need to connect to it to start using Jupyter notebook.
Ethernet
If available, you should connect your board to a network or router with Internet access. This will allow you to update your board and easily install new packages.
Connect to a Computer
You will need to have an Ethernet port available on your computer, and you will need to have permissions to configure your network interface. With a direct connection, you will be able to use PYNQ, but unless you can bridge the Ethernet connection to the board to an Internet connection on your computer, your board will not have Internet access. You will be unable to update or load new packages without Internet access.
Connect directly to a computer (Static IP):
- Assign your computer a static IP address
- Connect the board to your computer’s Ethernet port
- Browse to http://192.168.2.99
Connect to a Network Router
If you connect to a router, or a network with a DHCP server, your board will automatically get an IP address. You must make sure you have permission to connect a device to your network, otherwise the board may not connect properly.
Connect to a Router/Network (DHCP):
- Connect the Ethernet port on your board to a router/switch
- Connect your computer to Ethernet or WiFi on the router/switch
- Browse to http://<board IP address>
- Optional: Change the Hostname
- Optional: Configure Proxy Settings