Overlay Tutorial
This notebook gives an overview of how the Overlay class has changed in PYNQ 2.0 and how to use it efficiently.
The redesigned Overlay class has three main design goals * Allow overlay users to find out what is inside an overlay in a consistent manner * Provide a simple way for developers of new hardware designs to test new IP * Facilitate reuse of IP between Overlays
This tutorial is primarily designed to demonstrate the final two points, walking through the process of interacting with a new IP, developing a driver, and finally building a more complex system from multiple IP blocks. All of the code and block diagrams can be found at [https://github.com/PeterOgden/overlay_tutorial]. For these examples to work copy the contents of the overlays directory into the home directory on the PYNQ-Z1 board.
Developing a Single IP
For this first example we are going to use a simple design with a single IP contained in it. This IP was developed using HLS and adds two 32-bit integers together. The full code for the accelerator is:
void add(int a, int b, int& c) {
#pragma HLS INTERFACE ap_ctrl_none port=return
#pragma HLS INTERFACE s_axilite port=a
#pragma HLS INTERFACE s_axilite port=b
#pragma HLS INTERFACE s_axilite port=c

    c = a + b;
}
With a block diagram consisting solely of the HLS IP and required glue logic to connect it to the ZYNQ7 IP
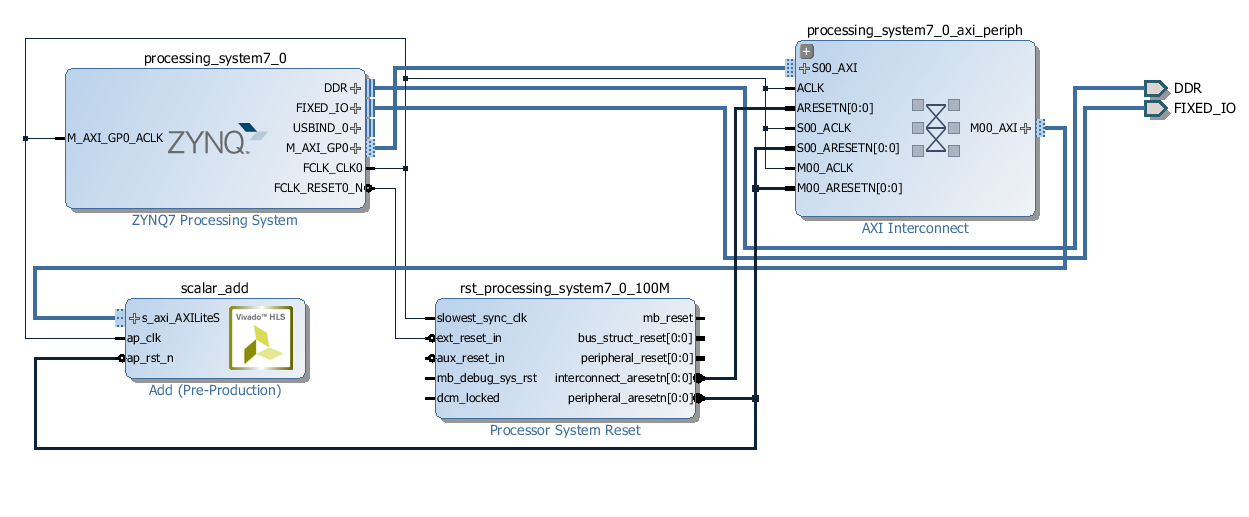
To interact with the IP first we need to load the overlay containing the IP.
[1]:
from pynq import Overlay

overlay = Overlay('/home/xilinx/tutorial_1.bit')
Creating the overlay will automatically download it. We can now use a question mark to find out what is in the overlay.
[2]:
overlay?
All of the entries are accessible via attributes on the overlay class with the specified driver. Accessing the scalar_add attribute of the will create a driver for the IP - as there is no driver currently known for the Add IP core DefaultIP driver will be used so we can interact with IP core.
[3]:
add_ip = overlay.scalar_add
add_ip?
Reading the source code generated by HLS tells us that use the core we need to write the two arguments to offset 0x10 and 0x18 and read the result back from 0x20.
[4]:
add_ip.write(0x10, 4)
add_ip.write(0x18, 5)
add_ip.read(0x20)
[4]:
9
Creating a Driver
While the UnknownIP driver is useful for determining that the IP is working it is not the most user-friendly API to expose to the eventual end-users of the overlay. Ideally we want to create an IP-specific driver exposing a single add function to call the accelerator. Custom drivers are created by inheriting from UnknownIP and adding a bindto class attribute consisting of the IP types the driver should bind to. The constructor of the class should take a single description
parameter and pass it through to the super class __init__. The description is a dictionary containing the address map and any interrupts and GPIO pins connected to the IP.
[5]:
from pynq import DefaultIP

class AddDriver(DefaultIP):
    def __init__(self, description):
        super().__init__(description=description)

    bindto = ['xilinx.com:hls:add:1.0']

    def add(self, a, b):
        self.write(0x10, a)
        self.write(0x18, b)
        return self.read(0x20)
Now if we reload the overlay and query the help again we can see that our new driver is bound to the IP.
[6]:
overlay = Overlay('/home/xilinx/tutorial_1.bit')
overlay?
And we can access the same way as before except now our custom driver with an add function is created instead of DefaultIP
[7]:
overlay.scalar_add.add(15,20)
[7]:
35
Reusing IP
Suppose we or someone else develops a new overlay and wants to reuse the existing IP. As long as they import the python file containing the driver class the drivers will be automatically created. As an example consider the next design which, among other things includes a renamed version of the scalar_add IP.
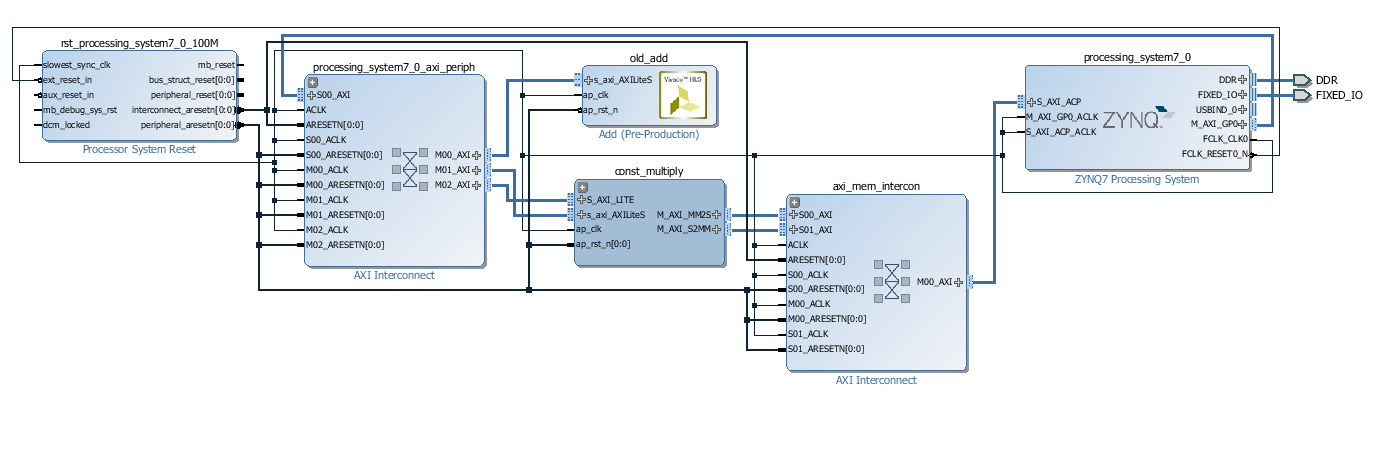
Using the question mark on the new overlay shows that the driver is still bound.
[8]:
overlay = Overlay('/home/xilinx/tutorial_2.bit')
overlay?
IP Hierarchies
The block diagram above also contains a hierarchy looking like this:
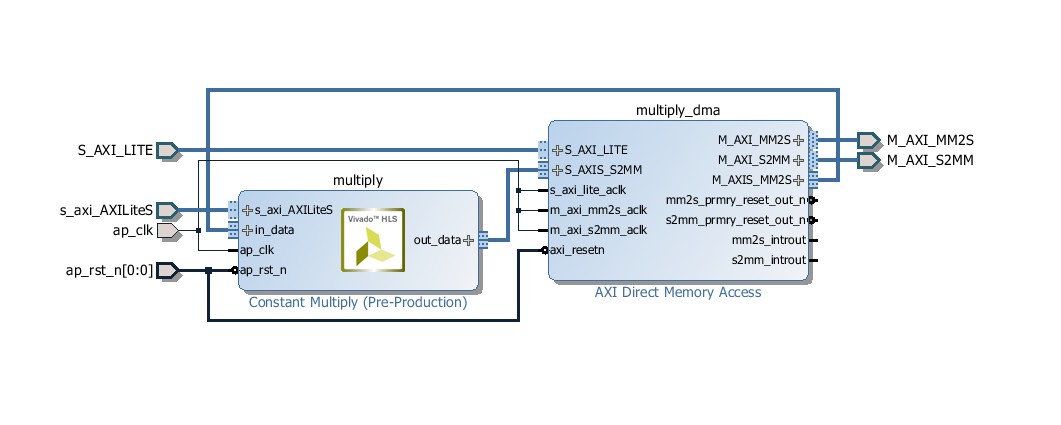
Containing a custom IP for multiple a stream of numbers by a constant and a DMA engine for transferring the data. As streams are involved and we need correctly handle TLAST for the DMA engine the HLS code is a little more complex with additional pragmas and types but the complete code is still relatively short.
typedef ap_axiu<32,1,1,1> stream_type;

void mult_constant(stream_type* in_data, stream_type* out_data, ap_int<32> constant) {
#pragma HLS INTERFACE s_axilite register port=constant
#pragma HLS INTERFACE ap_ctrl_none port=return
#pragma HLS INTERFACE axis port=in_data
#pragma HLS INTERFACE axis port=out_data
    out_data->data = in_data->data * constant;
    out_data->dest = in_data->dest;
    out_data->id = in_data->id;
    out_data->keep = in_data->keep;
    out_data->last = in_data->last;
    out_data->strb = in_data->strb;
    out_data->user = in_data->user;

}
Looking at the HLS generated documentation we again discover that to set the constant we need to set the register at offset 0x10 so we can write a simple driver for this purpose
[9]:
class ConstantMultiplyDriver(DefaultIP):
    def __init__(self, description):
        super().__init__(description=description)

    bindto = ['Xilinx:hls:mult_constant:1.0']

    @property
    def constant(self):
        return self.read(0x10)

    @constant.setter
    def constant(self, value):
        self.write(0x10, value)
The DMA engine driver is already included inside the PYNQ driver so nothing special is needed for that other than ensuring the module is imported. Reloading the overlay will make sure that our newly written driver is available for use.
[10]:
import pynq.lib.dma

overlay = Overlay('/home/xilinx/tutorial_2.bit')

dma = overlay.const_multiply.multiply_dma
multiply = overlay.const_multiply.multiply
The DMA driver transfers numpy arrays allocated using the xlnk driver. Lets test the system by multiplying 5 numbers by 3.
[11]:
from pynq import Xlnk
import numpy as np

xlnk = Xlnk()
in_buffer = xlnk.cma_array(shape=(5,), dtype=np.uint32)
out_buffer = xlnk.cma_array(shape=(5,), dtype=np.uint32)

for i in range(5):
    in_buffer[i] = i

multiply.constant = 3
dma.sendchannel.transfer(in_buffer)
dma.recvchannel.transfer(out_buffer)
dma.sendchannel.wait()
dma.recvchannel.wait()

out_buffer
[11]:
ContiguousArray([ 0, 3, 6, 9, 12], dtype=uint32)
While this is one way to use the IP, it still isn’t exactly user-friendly. It would be preferable to treat the entire hierarchy as a single entity and write a driver that hides the implementation details. The overlay class allows for drivers to be written against hierarchies as well as IP but the details are slightly different.
Hierarchy drivers are subclasses of pynq.DefaultHierarchy and, similar to DefaultIP have a constructor that takes a description of hierarchy. To determine whether the driver should bind to a particular hierarchy the class should also contain a static checkhierarchy method which takes the description of a hierarchy and returns True if the driver should be bound or False if not. Similar to DefaultIP, any classes that meet the requirements of subclasses DefaultHierarchy
and have a checkhierarchy method will automatically be registered.
For our constant multiply hierarchy this would look something like:
[12]:
from pynq import DefaultHierarchy

class StreamMultiplyDriver(DefaultHierarchy):
    def __init__(self, description):
        super().__init__(description)

    def stream_multiply(self, stream, constant):
        self.multiply.constant = constant
        with xlnk.cma_array(shape=(len(stream),), \
                            dtype=np.uint32) as in_buffer,\
             xlnk.cma_array(shape=(len(stream),), \
                            dtype=np.uint32) as out_buffer:
            for i, v, in enumerate(stream):
                in_buffer[i] = v
            self.multiply_dma.sendchannel.transfer(in_buffer)
            self.multiply_dma.recvchannel.transfer(out_buffer)
            self.multiply_dma.sendchannel.wait()
            self.multiply_dma.recvchannel.wait()
            result = out_buffer.copy()
        return result

    @staticmethod
    def checkhierarchy(description):
        if 'multiply_dma' in description['ip'] \
           and 'multiply' in description['ip']:
            return True
        return False
We can now reload the overlay and ensure the higher-level driver is loaded
[13]:
overlay = Overlay('/home/xilinx/tutorial_2.bit')
overlay?
and use it
[14]:
overlay.const_multiply.stream_multiply([1,2,3,4,5], 5)
[14]:
ContiguousArray([ 5, 10, 15, 20, 25], dtype=uint32)
Overlay Customisation
While the default overlay is sufficient for many use cases, some overlays will require more customisation to provide a user-friendly API. As an example the default AXI GPIO drivers expose channels 1 and 2 as separate attributes meaning that accessing the LEDs in the base overlay requires the following contortion
[15]:
base = Overlay('base.bit')
base.leds_gpio.channel1[0].on()
To mitigate this the overlay developer can provide a custom class for their overlay to expose the subsystems in a more user-friendly way. The base overlay includes custom overlay class which performs the following functions: * Make the AXI GPIO devices better named and range/direction restricted * Make the IOPs accessible through the pmoda, pmodb and ardiuno names * Create a special class to interact with RGB LEDs
The result is that the LEDs can be accessed like:
[16]:
from pynq.overlays.base import BaseOverlay

base = BaseOverlay('base.bit')
base.leds[0].on()
Using a well defined class also allows for custom docstrings to be provided also helping end users.
[17]:
base?
Creating a custom overlay
Custom overlay classes should inherit from pynq.UnknownOverlay taking a the full path of the bitstream file and possible additional keyword arguments. These parameters should be passed to super().__init__() at the start of __init__ to initialise the attributes of the Overlay. This example is designed to go with our tutorial_2 overlay and adds a function to more easily call the multiplication function
[18]:
class TestOverlay(Overlay):
    def __init__(self, bitfile, **kwargs):
        super().__init__(bitfile, **kwargs)

    def multiply(self, stream, constant):
        return self.const_multiply.stream_multiply(stream, constant)
To test our new overlay class we can construct it as before.
[19]:
overlay = TestOverlay('/home/xilinx/tutorial_2.bit')
overlay.multiply([2,3,4,5,6], 4)
[19]:
ContiguousArray([ 8, 12, 16, 20, 24], dtype=uint32)
Included Drivers
The pynq library includes a number of drivers as part of the pynq.lib package. These include
- AXI GPIO
- AXI DMA (simple mode only)
- AXI VDMA
- AXI Interrupt Controller (internal use)
- Pynq-Z1 Audio IP
- Pynq-Z1 HDMI IP
- Color convert IP
- Pixel format conversion
- HDMI input and output frontends
- Pynq Microblaze program loading