Verification
This section documents the test infrastructure supplied with the pynq package. It is organized as follows:
- Running Tests : describes how to run the pytest.
- Writing Tests : explains how to write tests.
- Miscellaneous : covers additional information relating to tests.
Running Tests
The pynq package provides tests for most python modules.
To run all the tests together, pytest can be run in a Linux terminal on the board. All the tests will be automatically collected in the current directory and child directories.
Note
The pytests have to be run as root
To run all the collected tests in a single shot:
cd /home/xilinx/pynq
sudo py.test –vsrw
For any given board, it is possible not to be able to use all the software drivers. For such cases, it is more common to run tests in a specific folder:
cd /home/xilinx/pynq/<driver_folder>
sudo py.test –vsrw
For a complete list of pytest options, please refer to Usage and Invocations - Pytest.
Collection Phase
During this phase, the pytest will collect all the test modules in the current directory and all of its child directories. The user will be asked to confirm the tests.
For example:
Test trace analyzers? ([yes]/no)>>> yes
For the answer to such a question, “yes”, “YES”, “Yes”, “y”, and “Y” are acceptable; the same applies for “no” as an answer. You can also press Enter; this is equivalent to “yes”.
Answering “No” will skip the corresponding test(s) during the testing phase.
Sometimes a device connected to the board will be required before the test.
Pmod OLED attached to the board? ([yes]/no)>>> yes
Type in the interface ID of the Pmod OLED (PMODA/PMODB):
For such a question, users need to type in the options specified inside the parentheses.
Testing Phase
The test suite will guide the user through all the tests implemented in the pynq package. As part of the tests, the user will be prompted for confirmation that the tests have passed, for example:
test_leds_on_off ...
Onboard LED 0 on? ([yes]/no)>>>
Again press “Enter”, or type “yes”, “no” etc.
At the end of the testing phase, a summary will be given to show users how many tests are passed / skipped / failed.
Writing Tests
This section follows the guide available on Pytest Usages and Examples. You can write a test class with assertions on inputs and outputs to allow automatic testing. The names of the test modules must start with test_; all the methods for tests in any test module must also begin with test_. One reason to enforce this is to ensure the tests will be collected properly. See the Full pytest documentation for more details.
Step 2
Decorators can be specified directly above the methods. For example, users can specify (1) the order of this test in the entire pytest process, and (2) the condition to skip the corresponding test. More information on decorators can be found in Marking test functions with attributes - Pytest.
An example will be given in the next step.
Step 3
Directly below decorators, you can write some assertions/tests. See the example below:
@pytest.mark.run(order=1)
def test_superuser():
"""Test whether the user have the root privilege.

Note
----
To pass all of the pytests, need the root access.

"""
assert os.geteuid() == 0, "Need ROOT access in order to run tests."
Note the assert statements specify the desired condition, and raise exceptions whenever that condition is not met. A customized exception message can be attached at the end of the assert methods, as shown in the example above.
Miscellaneous Test Setup
Some tests may require users to leverage jumper wires and external breadboard. Our pytest suite will provide some instructions for users to follow.
In some cases, two types of cables are used with the tests:
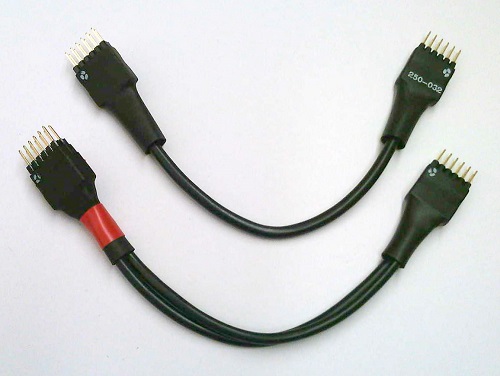
- Straight cable (upper one in the image): The internal wires between the two ends are straight. This cable is intended for use as an extension cable.
- Loopback cable (lower one in the image, with red ribbon): The internal wires are twisted. This cable is intended for testing.
There are marks on the connectors at each end of the cable to indicate the orientation and wiring of the cable.
Note
You must not short VCC and GND as it may damage the board. It is good practice to align the pins with the dot marks to VCC of the Pmod interfaces.
Note
For testing, there is only one connection type (mapping) allowed for each cable type. Otherwise VCC and GND could be shorted, damaging the board.