PYNQ SD Card
The PYNQ images for supported boards are provided precompiled as downloadable SD card images, so you do not need to rerun this flow for these boards unless you want to make changes to the image.
This flow can also be used as a starting point to build a PYNQ image for another Zynq / Zynq Ultrascale board.
The image flow will create the BOOT.bin, the u-boot bootloader, the Linux Device tree blob, and the Linux kernel.
The source files for the PYNQ image flow build can be found here:
<PYNQ repository>/sdbuild
More details on configuring the root filesystem can be found in the README file in the folder above.
Prepare the Building Environment
It is recommended to use a Ubuntu OS to build the image. The currently supported Ubuntu OS are listed below:
| Supported OS | Code name |
|---|---|
| Ubuntu 16.04 | xenial |
| Ubuntu 18.04 | bionic |
Use Vagrant to prepare Ubuntu OS
If you do not have a Ubuntu OS, you may need to prepare a Ubuntu virtual machine (VM) on your host OS. We provide in our repository a vagrant file that can help you install the Ubuntu VM on your host OS.
If you do not have a Ubuntu OS, and you need a Ubuntu VM, do the following:
Download the vagrant software and Virtual Box. Install them on your host OS.
In your host OS, open a terminal program. Locate your PYNQ repository, where the vagrant file is stored.
cd <PYNQ repository>(optional) Depending on your Virtual Box configurations, you may need to run the following command first; it may help you get better screen resolution for your Ubuntu VM.
vagrant plugin install vagrant-vbguestYou can then prepare the VM using the following command. This step will prepare a Ubuntu VM called pynq_ubuntu_<version> on your Virtual Box. The Ubuntu packages on the VM will be updated during this process; the Ubuntu desktop will also be installed so you can install Xilinx software later.
vagrant upThe above command will take about 20 minutes to finish. By default, our vagrant file will prepare a Ubuntu 16.04 OS. If you would like to use another OS, do:
vagrant up <ubuntu_code_name>For example, you can do the following to prepare a Ubuntu 18.04 OS:
vagrant up bionicThe supported OS and their corresponding code names are listed in the beginning of this section.
In the end, you will see a Virtual Box window popped up with only shell terminal, asking for your Ubuntu login information. Ignore this window and close it. Run the following command on your host:
vagrant reload <ubuntu_code_name>After running the above command, you will be asked to log onto your Ubuntu desktop. The username and password are both defaulted to vagrant. The current working directory on your host machine will be shared with /pynq on your VM. Always use vagrant reload command to reboot the VM; otherwise vagrant has no clue whether the VM has been rebooted, and users will not be able to see shared folder.
(optional) You can enable bidirectional clipboard between your host and your VM in your Virtual Box settings:
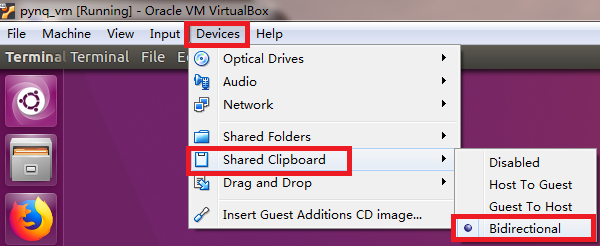
width: 400 Now you are ready to install Xilinx tools. You will need PetaLinux, Vivado, and SDK for building PYNQ image. Do not install Xilinx tools into /pynq since it is only a small shared folder. Instead, a 160GB disk space will be allocated at /workspace folder in VM. Install Xilinx tools there.
Starting from image v2.5, SDx is no longer needed. The version of Xilinx tools for each PYNQ release is shown below:
Release version Xilinx Tool Version v1.4 2015.4 v2.0 2016.1 v2.1 2017.4 v2.2 2017.4 v2.3 2018.2 v2.4 2018.3 v2.5 2019.1
Use existing Ubuntu OS
If you already have a Ubuntu OS, and it is listed in the beginning of this section, you can simply do the following:
Install dependencies using the following script. This is necessary if you are not using our vagrant file to prepare the environment.
<PYNQ repository>/sdbuild/scripts/setup_host.shInstall correct version of the Xilinx tools, including PetaLinux, Vivado, and SDK. See the above table for the correct version of each release.
Building the Image
Once you have the building environment ready, you can start to build the image following the steps below. You don’t have to rerun the setup_host.sh.
Source the appropriate settings for PetaLinux, Vivado, and SDK. Suppose you are using Xilinx 2019.1 tools:
source <path-to-vivado>/Vivado/2019.1/settings64.sh
source <path-to-sdk>/SDK/2019.1/settings64.sh
source <path-to-petalinux>/petalinux-v2019.1-final/settings.sh
petalinux-util --webtalk off
Navigate to the following directory and run make
cd <PYNQ repository>/sdbuild/
make
The build flow can take several hours. By default images for all of the supported boards will be built.
Using the prebuilt board-agnostic image
In order to simplify and speed-up the image building process, you can re-use the
prebuilt board-agnostic image appropriate to the architecture - arm for Zynq-7000
and aarch64 for Zynq UltraScale+, downloadable at the
boards page of our website. This will allow
you to completely skip the board-agnostic stage. It is important to notice however
that this will restrict the build process to only boards that share the same
architecture. You can do so by passing the PREBUILT variable when invoking make:
cd <PYNQ repository>/sdbuild/
make PREBUILT=<image path> BOARDS=<board>
Re-use the PYNQ source distribution tarball
To avoid rebuilding the PYNQ source distribution package, and consequently bypass
the need to build bitstreams (except for external boards) and MicroBlazes’ bsps
and binaries, a prebuilt PYNQ sdist tarball can be reused by specifying the
PYNQ_SDIST variable when invoking make. The tarball specific to the target
PYNQ version will be distributed when a new version is released on
GitHub.
cd <PYNQ repository>/sdbuild/
make PYNQ_SDIST=<sdist tarball path>
Please also refer to the sdbuild readme on our GitHub repository for more info regarding the image-build flow.
Retargeting to a Different Board
Additional boards are supported through external board repositories. A board
repository consists of a directory for each board consisting of a spec file and
any other files. The board repository is treated the same way as the <PYNQ
repository>/boards directory.
Elements of the specification file
The specification file should be name <BOARD>.spec where BOARD is the name
of the board directory. A minimal spec file contains the following information
ARCH_${BOARD} := arm
BSP_${BOARD} := mybsp.bsp
BITSTREAM_${BOARD} := mybitstream.bsp
where ${BOARD} is also the name of the board. The ARCH should be arm for
Zynq-7000 or aarch64 for Zynq UltraScale+. If no bitstream is provided then the
one included in the BSP will be used by default. All paths in this file
should be relative to the board directory.
To customise the BSP a petalinux_bsp folder can be included in the board
directory the contents of which will be added to the provided BSP before the
project is created. See the ZCU104 for an example of this in action. This is
designed to allow for additional drivers, kernel or boot-file patches and
device tree configuration that are helpful to support elements of PYNQ to be
added to a pre-existing BSP.
If a suitable PetaLinux BSP is unavailable for the board then this can be left
blank; in this case, an HDF file needs to be provided in the board directory.
The system.hdf file should be placed in the petalinux_bsp/hardware_project
folder and a new generic BSP will be created as part of the build flow.
Board-specific packages
A packages directory can be included in board directory with the same
layout as the <PYNQ repository>/sdbuild/packages directory. Each
subdirectory is a package that can optionally be installed as part of image
creation. See <PYNQ repository>/sdbuild/packages/README.md for a
description of the format of a PYNQ sdbuild package.
To add a package to the image you must also define a
STAGE4_PACKAGE_${BOARD} variable in your spec file. These can either
packages in the standard sdbuild library or ones contained within the board
package. It is often useful to add the pynq package to this list which will
ensure that a customised PYNQ installation is included in your final image.
Using the PYNQ package
The pynq package will treat your board directory the same as any of the
officially supported boards. This means, in particular, that:
- A
notebooksfolder, if it exists, will be copied into thejupyter_notebooksfolder in the image. Notebooks here will overwrite any of the default ones.- Any directory containing a bitstream will be treated as an overlay and copied into the overlays folder of the PYNQ installation. Any notebooks will likewise by installed in an overlay-specific subdirectory.
Building from a board repository
To build from a third-party board repository pass the ${BOARDDIR} variable to the
sdbuild makefile.
cd <PYNQ repository>/sdbuild/
make BOARDDIR=${BOARD_REPO}
The board repo should be provided as an absolute path. The ${BOARDDIR} variable
can be combined with the ${BOARD} variable if the repository contains multiple
boards and only a subset should be built.